This post is from November 15, 2018 and has been copied to my new blog
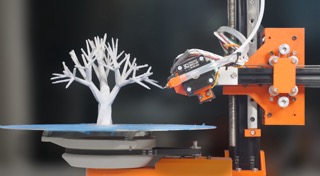
I started building my 3d printer in June of 2017 during my summer break, but it is still definitely not finished yet. The Hypercube Evolution 3d printer was designed by SCOTT_3D and is posted on thingiverse. This post will summarise my experience building my printer, such as which upgrades were worth it and what I am going to improve in the future. Hopefully this post will be helpful for people thinking of making their own HEVO or something similar.
Materials
For those of you who don't know, the HEVO requires quite a few 3d printed parts, such as the motor holder or the hot end carriage. I used my other 3d printer, a flashforge pro, to print out those parts. At first I printed them in pla, which is a brittle plastic with a relatively low melting point. I never had a problem with the low melting point of pla, as the hottest part that will be in contact with the plastic is the motor mounts, and stepper motors should generally not get too hot under normal use (even though they are rated to work even at 100 degrees C). The main problem that I had was the brittleness of the plastic. It would constantly crack in all kinds of places, especial where the brass inserts were. I eventually came to me senses and replaced all my pla parts with petg parts, which are much more temperature resistant and also a lot less brittle. I came to this realisation a little late however, and my printer was mostly held together by zip ties while printing out its replacement parts. Moral of the story, print your parts in petg or abs (not pla).

8-Bit to 32-Bit
I started out with using the generic 3d printing electronics, a ramps 1.4 board controlled by an 8-bit arduino mega using pololu A4988 stepper motor drivers. This served me well for the first couple months while I got everything set up properly. I had read a bit about the so called "8-bit speed limit" which is just how an 8 bit micro controller would start to stutter when doing very fast and complex moves while it is being sent g-code from a computer. I never really ran into this issue as I always uploaded my prints to an SD card and plugged that into my printer. I still however decided to upgrade to a 32-bit board, specifically the Re-Arm by Panucatt Devices. It is a drop in replacement for an Arduino mega, which meant that I could still use my ramps board. I was at first hesitant to use this board as it said it only supported Smoothieware, which I didn't want to switch to from Marlin, which I had become accustom to. I eventually decided to go ahead and buy this $50 board when I read that there was a 32-bit version of Marlin called Marlin2.0. The only real improvement of the Re-Arm board for me was the ability to use S-curve acceleration, which as you can see in this YouTube video, really makes things much more smooth. I wouldn't really recommend this upgrade, as there are ways to make you 3d printer better for the same price, as $50 is quite a lot of money in the 3d printing world.

Stepper Drivers
As I said in the section above, I started with A4988 stepper drivers, which are extremely loud. I couldn't print things overnight due to how noisy my printer was while using those drivers, limiting my max print times to only around 12 hours. I also couldn't just set my printer to print before I went to bed, and then just pick up the finished print when I woke up the next morning. This pushed me to buy 2 of the rather pricey TMC2130 stepper drivers, which are much quieter. I though I had done something wrong when I first tested my printer using those drivers, as I couldn't even hear anything. It is possible to connect the TMC2130 drivers to the control board, which I tried doing but could never get to work properly. When I tried to change the settings of the drivers using the Marlin, the stepper motors would just whine and be really loud. This led me to just use the drivers without connecting them to the control board. I eventually ended up breaking one of my TMC2130 drivers (I'm not exactly sure how) so I bought 4 TMC2100 drivers for all 4 axes. This made the E and Z axes quiet as well, which also surprisingly made quite a noticeable reduction in the noise produced by the printer while it was printing. I am overall very happy that I upgraded my stepper drivers and it is probably one of my favourite upgrades.

Octoprint
Octoprint is just a way to control your 3d printer over the internet. It runs on a Raspberry Pi and allows you to upload files to your printer remotely, and also to start and stop prints. The most useful feature imo is how it lets you monitor your prints remotely. I connected a C270 Logitech camera to my Pi, so I can go on the website to look at a live feed of my print. I am also able to control my 3d printer's LED lights, and turn the whole printer on and off using the website. For a relatively small investment of just a Raspberry Pi (or an even smaller investment if you use an Orange Pi), you can greatly increase the functionality of your 3d printer.
AC Silicon Heater
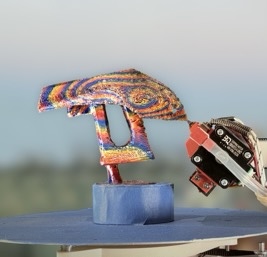
My printer runs on 12 volts, and heating a 300mm by 300mm bed up to anythings above 40 or 50 degrees is almost impossible at that voltage. I eventually opted to get a mains silicon heater, which means that instead of being powered by just 12v, it is powered by the 230v coming straight out of your power outlet. My heat bed went from barely being able to reach 50 degrees in 20 minutes to being able to get up to over 100 degrees in just a few minutes. I also needed a way to switch 230v with a 12v control signal, so I bought a solid state relay to do this (you can see it in the image above on the top right). A hot heated bed is really more for printing in abs, which I never do anymore due to it being just a worse version of petg (also it smells pretty terrible). The heated bed is still useful for printing in pla and petg however, as it increases bed adhesion, which anyone who 3d prints knows is very important to prevent warping and failed prints.
Auto Bed Leveling
Getting auto bed leveling to work was one of the biggest problems I faced when I started off making my printer. Even though it can be difficult to get working, it is one of the most amazing, useful and time saving aspect of my printer. Auto bed leveling works by using a z probe to see the differences in height of each part of the print bed. When the printer prints, it will remember the height differences in each part of the bed and adjust the nozzle height to be the same distance to the bed at all times. This saves times of time because I don't have to try level a massive 30cm squared bed every month or so. The issue that was quite annoying was that almost all z probes run on 12v, while my control board's max voltage for endstop inputs is 5v. I first tried using a voltage divider, but something about it just wasn't right and it didn't work very well. I ended up using a very crudely put together contraption made of a few wires soldered to a transistor. It took in 12v as an input and returned 5v as an output. This works well but I am too afraid to touch it, just in case I break it. A z probe not triggering is possibly one of the most destructive errors that can happen, as if the endstop doesn't trigger, the bed will continue to try rise as it smashes into the hot end. I also have to be careful to not try home the z axis while the hot end is cold, because if a little piece of plastic gets stuck on the nozzle, it can cause the bed to hit the solid plastic before the z probe can trigger, which leads to the z probe being pushed away and the bed continuing to smash into the hot end which is never great.
Z-Banding Issues
The biggest print quality related issue I have had with my 3d printer is very subtle z banding. It isnt regular z banding that is caused by a bent z lead screw, and it also isn't caused by fluctuations in the print bed temperature. At first it seemed like the issue was that the pulleys' grub screws were not tight enough, leading to the hot end carriage being able move around slightly. This reduced the amount of banding I was getting but it was still definitely there. I tried using anti backlash screws, longer z axis bearings and also tried turning off z bed auto leveling (which I turned back on immediately because it is just so helpful), but nothing seems to have worked. I have just come to terms with the fact that I may never get rid of this very slight z axis wobble. I have read that the layer misalignment is due to the relatively very long belts used in a core-xy printer, which can stretch while printing. It isn't a massive flaw, and can only be seen if you hold a print up at just the right angle to a light, so I think I'll just live with it.
Conclusion
In conclusion, I think that this project was a success. My HEVO now prints extremely reliably and has a pretty good print quality. My Flashforge still prints better, but I don't like comparing prints from my HEVO to my Flashforge's, mostly because of the price difference (about $300 vs over $1000). This project was more about making my own 3d printer and getting experience. From making this 3d printer, I have become much more confident about working with 3d printers and how they actually work. I have also become much better at understanding electronics and how to wire things up in a way that doesn't break everything. It has been a very fun and practical project, and probably my biggest and most labor intensive one to date.